一、异步FIFO 1.1 异步FIFO的定义 异步时序设计指的是在设计中有两个或以上的时钟, 且时钟之间是同频不同相或不同频率的关系。而异步时序设计的关键就是把数据或控制信号正确地进行跨时钟域传输。
Memory, 作为数据的存储器;
写逻辑部分,主要负责产生写信号和地址;
读逻辑部分,主要负责产生读信号和地址;
地址比较部分,主要负责产生 FIFO 空、满的标志。
跟普通的FIFO相比,异步FIFO实际上多了读写地址的跨时钟域同步的逻辑,以及两个时钟域中读写信号的比较逻辑。
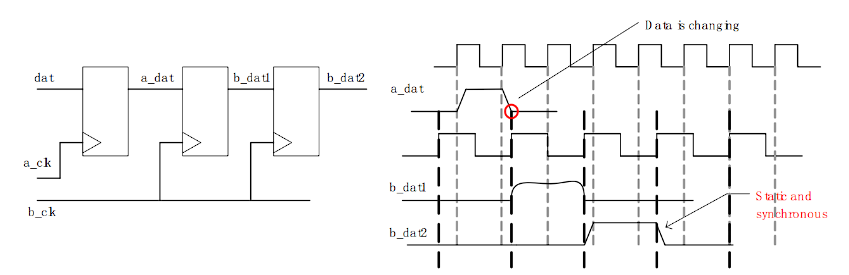
1.2 亚稳态 每一个触发器都有其规定的建立(setup)和保持(hold)时间参数, 在这个时间参数内, 输入信号在时钟的上升沿是不允许发生变的。 如果在信号的建立时间中对其进行采样, 得到的结果将是不可预知的,即亚稳态。
时钟域B两级同步的寄存器跟时钟域A的输出寄存器之间不能有组合逻辑。组合逻辑电路各个输入信号的不一致性以及组合逻辑内部路径的延时时间不一样,运算后的信号存在毛刺。
1.3 异步FIFO关键技术一 这里用到了一个很重要的概念“回卷”,通常判断读写的地址是否相同来判断空和满,这里使用回卷技术,在深度为8的fifo中多一位来代表回卷位,当fifo溢出之后,回卷位会被置1,当读时钟和写时钟的回卷位不同而其他位相同时,表示fifo已经满,因为写地址在溢出后的位置,而读时钟在溢出前。
1.3 异步FIFO关键技术二 将满和将空信号实际上表示更加保守的满和空信号。基本思路是,设定一个间隔值,当读写地址之间的间隔小于或等于该间隔就产生将空或将满信号。
1.4 FIFO逻辑图
二、UVM结构 该项目的UVM包括以下几个文件:
现在对每一个文件进行解释。
2.1 interface 该文件主要是用于连接DUT的物理信号与UVM的事件信号,起主要是在top_tb中进行定义和连接,然后通过uvm_config_db进行定点发送。
1
2
3
4
5
6
7
8
9
10
11
12
13
14
15
16
17
18
19
20
21
22
23
24
25
26
27
28
29
30
31
32
33
34
35
36
37
38
39
40
41
42
43
44
45
46
47
48
49
50
51
52
53
54
55
`ifndef FIFO_IF__SV `define FIFO_IF__SV interface fifo_if (input wclk, input rclk, input wreset_b, input rreset_b); logic write,read; logic [31 : 0 ] wdata; logic [31 : 0 ] rdata; wire wfull,rempty; clocking ckw @(posedge wclk); input wfull; inout write; inout wdata; endclocking clocking ckim @(posedge wclk); input wfull; inout write; input wdata; endclocking clocking ckom @(posedge rclk); input rempty; inout read; input rdata; endclocking modport DUT ( input write, input read, input wdata, output rdata, output wfull, output rempty ) ; modport DRV ( clocking ckw, input read, input rdata, input rempty ) ; modport OMON ( clocking ckom, input wfull, input write, input wdata ) ;endinterface `endif
clocking主要是定义每个logic信号的方向,同时制定该信号同步的时钟域。括号里信号的作用是控制 clocking 块内的所有信号的同步时序。时钟信号 的上升沿会触发对这些信号的采样或更新 。
2.2 transaction transaction主要是用于对信号进行打包操作,本项目只有一个输入data_in,因此只需要生成一个随机数据。同时基于约束并注册(这是基本操作)。
1
2
3
4
5
6
7
8
9
10
11
12
13
14
15
16
17
18
19
20
21
22
`ifndef FIFO_TRANSACTION__SV `define FIFO_TRANSACTION__SV class fifo_transaction extends uvm_sequence_item ; rand bit[31 :0 ] data_in[]; constraint data_in_c { soft data_in.size inside {[1 :300 ]}; } `uvm_object_utils_begin(fifo_transaction) `uvm_field_array_int(data_in,UVM_ALL_ON) `uvm_object_utils_end function new (string name = "fifo_transaction" ) ; super .new(name); endfunction endclass `endif
2.3 driver 驱动器是UVM中的核心,代码如下所示:
1
2
3
4
5
6
7
8
9
10
11
12
13
14
15
16
17
18
19
20
21
22
23
24
25
26
27
28
29
30
31
32
33
34
35
36
37
38
39
40
41
42
43
44
45
46
47
48
49
50
51
52
53
54
55
56
57
58
59
60
61
62
63
`ifndef FIFO_DRIVER__SV `define FIFO_DRIVER__SV class fifo_driver extends uvm_driver #(fifo_transaction); virtual fifo_if vif; covergroup cov_label; option.per_instance = 1 ; option.auto_bin_max = 2 ; coverpoint vif.wfull; coverpoint vif.rempty; endgroup `uvm_component_utils(fifo_driver) function new (string name = "fifo_driver" , uvm_component parent = null ) ; super .new(name, parent); cov_label = new (); endfunction virtual function void build_phase (uvm_phase phase) ; super .build_phase(phase); if (!uvm_config_db#(virtual fifo_if)::get(this ,"" ,"vif" ,vif)) `uvm_fatal("fifo_driver" ,"virtual interface must be set for vif!!!" ) endfunction extern task main_phase (uvm_phase phase) ; extern task drive_one_pkt (fifo_transaction tr) ; endclass task fifo_driver::main_phase(uvm_phase phase); `uvm_info("fifo_driver" ,"begin!" ,UVM_LOW) while (1 ) begin seq_item_port.get_next_item(req); drive_one_pkt(req); seq_item_port.item_done(); end endtask task fifo_driver::drive_one_pkt(fifo_transaction tr); int data_size,j; data_size = tr.data_in.size(); `uvm_info("fifo_driver" ,"begin to drive one pkt" ,UVM_LOW) for (int i = 0 ; i < data_size; i++) begin @(vif.ckw); if ((!vif.ckw.wfull) && (vif.ckw.write == 1 )) begin cov_label.sample(); vif.ckw.wdata <= tr.data_in[i]; `uvm_info("fifo_driver" ,$sformatf("%0d number is sent,number is %0h" ,j++,vif.ckw.wdata),UVM_LOW) end else if ((!vif.ckw.wfull) && (vif.ckw.write == 0 )) begin vif.ckw.write <= 1 ; i--; end else begin vif.ckw.write <= 0 ; i--; end end endtask `endif
关于覆盖率这里我们先不做介绍,后续会单独做期来讲解覆盖率
需要注意几点,首先在初始化函数中使用uvm_config_db来获取DUT信号,用于对DUT的信号进行写入与读取。seq_item_port来获得一个包(就是刚才说的随机数据),这个端口会在agent中进行连接,来源就是sequencer,然后将包中的信息发送到DUT上。@(vif.ckw);来捕获时钟上升沿,然后通过wfull和write的状态来决定是否发送数据。
可以看到,write和wdata信号均有写入和读取的操作,因此在ckw中设置为inout信号
2.3 moniter moniter的作用在于接受DUT的信息,有在输入和输出都有一个moniter。
1
2
3
4
5
6
7
8
9
10
11
12
13
14
15
16
17
18
19
20
21
22
23
24
25
26
27
28
29
30
31
32
33
34
35
36
37
38
39
40
41
42
43
44
45
46
47
48
49
50
51
`ifndef FIFO_IN_MONITOR__SV `define FIFO_IN_MONITOR__SV class fifo_in_monitor extends uvm_monitor ; virtual fifo_if vif; uvm_analysis_port #(fifo_transaction) ap; `uvm_component_utils(fifo_in_monitor) function new (string name = "fifo_in_monitor" , uvm_component parent = null ) ; super .new(name, parent); endfunction virtual function void build_phase (uvm_phase phase) ; super .build_phase(phase); if (!uvm_config_db#(virtual fifo_if)::get(this , "" , "vif" , vif)) `uvm_fatal("fifo_in_monitor" , "virtual interface must be set for vif!!!" ) ap = new ("ap" , this ); endfunction extern virtual task main_phase (uvm_phase phase) ; extern task collect_one_pkt (fifo_transaction tr) ; endclass task fifo_in_monitor::main_phase(uvm_phase phase); fifo_transaction tr; repeat(2 ) begin tr = new ("tr" ); #4.001 ; collect_one_pkt(tr); ap.write(tr); end endtask task fifo_in_monitor::collect_one_pkt(fifo_transaction tr); int j,k; `uvm_info("in_monitor" ,"begin to collect one pkt" ,UVM_LOW) while (1 ) begin @(vif.ckim); if ((!vif.ckim.wfull) && (vif.ckim.write == 1 )) begin tr.data_in[j] = vif.ckim.wdata; `uvm_info("in_monitor" ,$sformatf("%0d number is received,number is %0h" ,k++,vif.ckim.wdata),UVM_LOW) if (j == 199 ) break ; j++; end end `uvm_info("in_monitor" ,"end collect one pkt" ,UVM_LOW) endtask `endif
与driver一样,也要使用uvm_config_db来获取DUT信号。uvm_analysis_port端口其作用就是把接收到的数据transcation发送出。#4.001大概率是为了等待刚刚发送的数据发送,这里挖一个坑 。#4.001,第二个就是使用的读时钟块ckom以及传输的是rdata。
2.4 sequencer sequencer相当于sequence的下手,用于帮sequence传递数据的。
1
2
3
4
5
6
7
8
9
10
11
12
13
14
15
`ifndef FIFO_SEQUENCER__SV `define FIFO_SEQUENCER__SV class fifo_sequencer extends uvm_sequencer #(fifo_transaction); `uvm_component_utils(fifo_sequencer) function new (string name = "fifo_sequencer" ,uvm_component parent = null ) ; super .new(name,parent); endfunction task main_phase (uvm_phase phase) ; `uvm_info("fifo_sequencer" ,"main_phase begin" ,UVM_LOW) endtask endclass `endif
代码里没有要讲的,仅仅就定义了一下自己。
2.5 agent agent的作用仅仅就是将三巨头sequencer、driver和monitor进行连接。
1
2
3
4
5
6
7
8
9
10
11
12
13
14
15
16
17
18
19
20
21
22
23
24
25
26
27
28
29
30
31
32
33
34
35
36
37
`ifndef FIFO_IN_AGENT__SV `define FIFO_IN_AGENT__SV class fifo_in_agent extends uvm_agent ; fifo_sequencer sqr; fifo_driver drv; fifo_in_monitor mon; uvm_analysis_port #(fifo_transaction) ap; `uvm_component_utils(fifo_in_agent) function new (string name = "fifo_in_agent" , uvm_component parent) ; super .new(name, parent); endfunction extern virtual function void build_phase (uvm_phase phase) ; extern virtual function void connect_phase (uvm_phase phase) ; endclass function void fifo_in_agent::build_phase(uvm_phase phase); super .build_phase(phase); if (is_active == UVM_ACTIVE) begin drv = fifo_driver::type_id::create("i_drv" ,this ); sqr = fifo_sequencer::type_id::create("i_sqr" ,this ); end mon = fifo_in_monitor::type_id::create("i_mon" ,this ); endfunction function void fifo_in_agent::connect_phase(uvm_phase phase); super .connect_phase(phase); if (is_active == UVM_ACTIVE) begin drv.seq_item_port.connect(sqr.seq_item_export); end ap = mon.ap; endfunction `endif
需要注意的是,这里和moniter一样定义了一个uvm_analysis_port 端口,并且在connect_phase中使用ap = mon.ap;的方式将mon的ap的指针指向了该ap,实现外部直接调用mon.ap。is_active 是agent的固有方法,用来区分输入和输出。但是本项目中还定义了一个out_agent,这个方法应该冗余了。在out_agent中的mon变为out_mon,其余不变。
2.6 model model按理来说应该是一个参考,用来实现与DUT相同的操作,但这里仅仅定义了两个端口,从port端口到ap。
1
2
3
4
5
6
7
8
9
10
11
12
13
14
15
16
17
18
19
20
21
22
23
24
25
26
27
28
29
30
31
32
33
34
35
36
37
38
39
`ifndef FIFO_MODEL__SV `define FIFO_MODEL__SV class fifo_model extends uvm_component ; uvm_blocking_get_port #(fifo_transaction) port; uvm_analysis_port #(fifo_transaction) ap; extern function new (string name, uvm_component parent) ; extern function void build_phase (uvm_phase phase) ; extern virtual task main_phase (uvm_phase phase) ; `uvm_component_utils(fifo_model) endclass function fifo_model::new (string name, uvm_component parent); super .new(name, parent); endfunction function void fifo_model::build_phase(uvm_phase phase); super .build_phase(phase); port = new ("port" , this ); ap = new ("ap" , this ); endfunction task fifo_model::main_phase(uvm_phase phase); fifo_transaction tr; fifo_transaction new_tr; super .main_phase(phase); while (1 ) begin port.get(tr); new_tr = new ("new_tr" ); new_tr.copy(tr); `uvm_info("fifo_model" , "get one transaction, copy and print it:" , UVM_LOW) new_tr.print(); ap.write(new_tr); end endtask `endif
2.7 scoreboard scoreboard用于收集来自agent以及model的数据。
1
2
3
4
5
6
7
8
9
10
11
12
13
14
15
16
17
18
19
20
21
22
23
24
25
26
27
28
29
30
31
32
33
34
35
36
37
38
39
40
41
42
43
44
45
46
47
48
49
50
51
52
53
54
55
56
57
58
`ifndef FIFO_SCOREBOARD__SV `define FIFO_SCOREBOARD__SV class fifo_scoreboard extends uvm_scoreboard ; fifo_transaction expect_queue[$]; uvm_blocking_get_port #(fifo_transaction) exp_port; uvm_blocking_get_port #(fifo_transaction) act_port; `uvm_component_utils(fifo_scoreboard) extern function new (string name, uvm_component parent = null ) ; extern virtual function void build_phase (uvm_phase phase) ; extern virtual task main_phase (uvm_phase phase) ; endclass function fifo_scoreboard::new (string name, uvm_component parent = null ); super .new(name, parent); endfunction function void fifo_scoreboard::build_phase(uvm_phase phase); super .build_phase(phase); exp_port = new ("exp_port" , this ); act_port = new ("act_port" , this ); endfunction task fifo_scoreboard::main_phase(uvm_phase phase); fifo_transaction get_expect, get_actual, tmp_tran; bit result; super .main_phase(phase); fork while (1 ) begin exp_port.get(get_expect); expect_queue.push_back(get_expect); end while (1 ) begin act_port.get(get_actual); if (expect_queue.size() > 0 ) begin tmp_tran = expect_queue.pop_front(); result = get_actual.compare(tmp_tran); if (result) begin `uvm_info("fifo_scoreboard" , "Compare SUCCESSFULLY" , UVM_LOW); end else begin `uvm_error("fifo_scoreboard" , "Compare FAILED" ); $display("the expect pkt is" ); tmp_tran.print(); $display("the actual pkt is" ); get_actual.print(); end end else begin `uvm_error("fifo_scoreboard" , "Received from DUT, while Expect Queue is empty" ); $display("the unexpected pkt is" ); get_actual.print(); end end join endtask `endif
这里定义了两个接受端口,分别是exp_port以及act_port,其中exp_port来自fifo_model的输入,表示参考的数据。act_port来自o_agt,表示DUT的输出值。将这两个数值进行比较,从而判断程序是否发生错误。
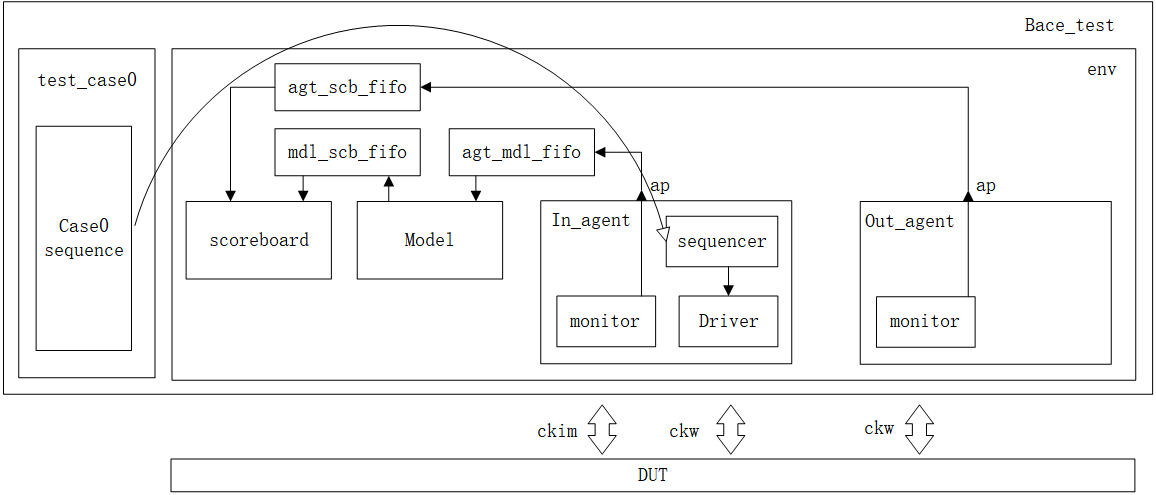
2.8 env env是整个UVM最接近顶层的存在,其主要包括三个部分:agent、model以及scoreboard。
1
2
3
4
5
6
7
8
9
10
11
12
13
14
15
16
17
18
19
20
21
22
23
24
25
26
27
28
29
30
31
32
33
34
35
36
37
38
39
40
41
42
43
44
45
46
`ifndef MY_ENV__SV `define MY_ENV__SV class my_env extends uvm_env ; fifo_in_agent i_agt; fifo_out_agent o_agt; fifo_model mdl; fifo_scoreboard scb; uvm_tlm_analysis_fifo #(fifo_transaction) agt_scb_fifo; uvm_tlm_analysis_fifo #(fifo_transaction) agt_mdl_fifo; uvm_tlm_analysis_fifo #(fifo_transaction) mdl_scb_fifo; function new (string name = "my_env" , uvm_component parent) ; super .new(name, parent); endfunction virtual function void build_phase (uvm_phase phase) ; super .build_phase(phase); i_agt = fifo_in_agent::type_id::create("i_agt" , this ); o_agt = fifo_out_agent::type_id::create("o_agt" , this ); i_agt.is_active = UVM_ACTIVE; o_agt.is_active = UVM_PASSIVE; mdl = fifo_model::type_id::create("mdl" , this ); scb = fifo_scoreboard::type_id::create("scb" , this ); agt_scb_fifo = new ("agt_scb_fifo" , this ); agt_mdl_fifo = new ("agt_mdl_fifo" , this ); mdl_scb_fifo = new ("mdl_scb_fifo" , this ); endfunction extern virtual function void connect_phase (uvm_phase phase) ; `uvm_component_utils(my_env) endclass function void my_env::connect_phase(uvm_phase phase); super .connect_phase(phase); i_agt.ap.connect(agt_mdl_fifo.analysis_export); mdl.port.connect(agt_mdl_fifo.blocking_get_export); mdl.ap.connect(mdl_scb_fifo.analysis_export); scb.exp_port.connect(mdl_scb_fifo.blocking_get_export); o_agt.ap.connect(agt_scb_fifo.analysis_export); scb.act_port.connect(agt_scb_fifo.blocking_get_export); endfunction `endif
这里面共定义了三个fifo,用来构建三者之间数据的缓冲,具体传输方向如下所示:
2.9 base_test base_test才是UVM真正的顶层,他的主要作用很简单,除了例化一个env之外,还可以进行项目错误的统计工作。
1
2
3
4
5
6
7
8
9
10
11
12
13
14
15
16
17
18
19
20
21
22
23
24
25
26
27
28
29
30
31
32
33
34
35
36
37
`ifndef BASE_TEST__SV `define BASE_TEST__SV class base_test extends uvm_test ; my_env env; function new (string name = "base_test" , uvm_component parent = null ) ; super .new(name,parent); endfunction extern virtual function void build_phase (uvm_phase phase) ; extern virtual function void report_phase (uvm_phase phase) ; `uvm_component_utils(base_test) endclass function void base_test::build_phase(uvm_phase phase); super .build_phase(phase); env = my_env::type_id::create("env" , this ); endfunction function void base_test::report_phase(uvm_phase phase); uvm_report_server server; int err_num; super .report_phase(phase); server = get_report_server(); err_num = server.get_severity_count(UVM_ERROR); if (err_num != 0 ) begin $display("TEST CASE FAILED" ); end else begin $display("TEST CASE PASSED" ); end endfunction `endif
在report_phase中定义了一个uvm_report_server 用于检测错误,根据错误的数目输出验证通过与否。
2.10 case_sequence 这个相当于独立于整个UVM树之外的一个部分,用于产生激励信号。
1
2
3
4
5
6
7
8
9
10
11
12
13
14
15
16
17
18
19
20
21
22
23
24
25
26
27
28
29
30
31
32
33
34
35
36
37
38
39
40
41
42
43
`ifndef FIFO_CASE0__SV `define FIFO_CASE0__SV class case0_sequence extends uvm_sequence #(fifo_transaction); fifo_transaction trans; `uvm_object_utils(case0_sequence) function new (string name = "case0_sequence" ) ; super .new(name); endfunction virtual task body () ; repeat(2 ) begin `uvm_info("case0_sequence" ,"generate one transaction!" ,UVM_LOW) `uvm_do_with(trans,{trans.data_in.size == 200 ;}) end endtask endclass class test_case0 extends base_test ; `uvm_component_utils(test_case0) function new (string name = "test_case0" , uvm_component parent = null ) ; super .new(name,parent); endfunction function void build_phase (uvm_phase phase) ; super .build_phase(phase); endfunction task main_phase (uvm_phase phase) ; case0_sequence seq; phase.raise_objection(this ); #4 ; seq = case0_sequence::type_id::create("l_seq" ); `uvm_info("case0_sequence" ,"case1_sequence begin" ,UVM_LOW) seq.start(env.i_agt.sqr); #3000 ; phase.drop_objection(this ); endtask endclass `endif
在这里,使用uvm_do_with宏的方法实现将特定的数据传输到sequencer。但这里值得注意的是,在下面定义了一个从属于base_test的类test_case0 ,其也是UVM树的一部分,是从属于base_test的,因此与env的关系很近,但是这里其作用仅仅就是建立一个case0_sequence 并且运行,同时还是用phase.raise_objection(this)与phase.drop_objection(this)定义整个sequence事件的开始与结束。在这里指定了env.i_agt.sqr为发射的地点。
2.11 top_tb 这就是最终的tb文件,代码如下,具体就不说了,无非就是例化初始化之类的操作,以及保存波形。
这里挖一个坑,针对这里asyn_fifo_chk_rst还没了解清楚。
1
2
3
4
5
6
7
8
9
10
11
12
13
14
15
16
17
18
19
20
21
22
23
24
25
26
27
28
29
30
31
32
33
34
35
36
37
38
39
40
41
42
43
44
45
46
47
48
49
50
51
52
53
54
55
56
57
58
59
60
61
62
63
64
65
66
67
68
69
70
71
72
73
74
75
76
77
78
79
`timescale 1ns/1ps `include "uvm_macros.svh" import asyn_fifo_chk_rst::*;import uvm_pkg::*;module top_tb () ;logic wclk,rclk,wreset_b,rreset_b; fifo_if my_if (wclk,rclk,wreset_b,rreset_b) ; fifo_top DUT ( .wclk (wclk) , .rclk (rclk), .wreset_b (wreset_b), .rreset_b (rreset_b), .write (my_if.write), .read (my_if.read), .wdata (my_if.wdata), .wfull (my_if.wfull), .rempty (my_if.rempty), .rdata (my_if.rdata) ); fifo_rst_mon fifo_rst_mon1; fifo_chk_rst fifo_chk_rst1; event reset_e_w; event reset_e_r; initial begin wclk = 0 ; rclk = 0 ; wreset_b = 1 ; rreset_b = 1 ; #2 wreset_b = 0 ; rreset_b = 0 ; my_if.write = 0 ; my_if.read = 0 ; #2 wreset_b = 1 ; rreset_b = 1 ; end always #1 wclk = ~wclk; always #3 rclk = ~rclk; initial begin uvm_config_db#(virtual fifo_if)::set(null ,"uvm_test_top.env.i_agt.i_drv" ,"vif" ,my_if); uvm_config_db#(virtual fifo_if)::set(null ,"uvm_test_top.env.i_agt.i_mon" ,"vif" ,my_if); uvm_config_db#(virtual fifo_if)::set(null ,"uvm_test_top.env.o_agt.o_mon" ,"vif" ,my_if); end initial begin fifo_rst_mon1 = new (reset_e_w,reset_e_r); fifo_chk_rst1 = new (reset_e_w,reset_e_r); fifo_rst_mon1.my_if6 = my_if; fifo_chk_rst1.my_if7 = my_if; fork fifo_rst_mon1.run(); fifo_chk_rst1.run(); join end initial begin $fsdbDumpfile("tb.fsdb" ); $fsdbDumpvars; $fsdbDumpon; end initial begin run_test ("test_case0" ) ; end endmodule
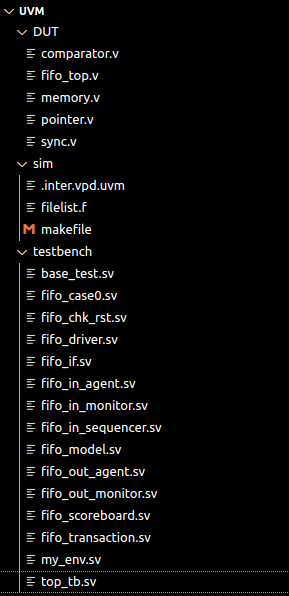
三、UVM仿真环境的搭建 这里我简单说一下,因为在环境搭建的过程中踩了很多坑,在网上的教程很乱,也没有一个完美的答案,这里就介绍一下我搭建UVM的结构图:
可以看出,我这里建立了三个文件夹,有源码DUT部分,存放仿真文件以及启动文件的sim还有存放tb文件和uvm文件的testbench文件。最重要的就是启动文件filelist和Makefile的编写。
3.1 Makefile文件的编写 先给出我的Makefile文件:
1
2
3
4
5
6
7
8
9
10
11
12
13
14
15
16
17
18
19
20
21
22
23
24
25
26
27
28
29
30
31
32
33
34
35
36
37
.PHONY:file vcs sim verdi clean VCS = vcs -full64 -cpp g++-4.8 -cc gcc-4.8 \ -LDFLAGS -Wl,--no-as-needed \ -f filelist.f \ -timescale=1 ns/1 ps \ -R \ -debug_acc+all \ +define+FSDB \ -lca -kdb \ -ntb_opts uvm-1.1 \ -sverilog \ +v2k \ |tee vcs.log file: find ../ -name "*.v" -o -name "*.sv" > file.f vcs: ${VCS} sim: ./simv -gui |tee sim.log & verdi: verdi -f filelist.f -sv -ssf tb.fsdb & clean: rm -rf csrc verdiLog simv.daidir \ novas.* \ vc_hdrs.h \ simv \ *.key \ *.fsdb \ *.log \ inter.vpd \ DVEfiles
这里包括了五个部分,分别是file、vcs、sim、verdi以及clean。我分开来介绍:
file:
vcs:vcs help来获取vcs命令手册,里面解释了所有符号的意义以及用法。
1 2 3 4 5 6 7 8 9 10 11 12 13 14 15 16 17 18 19 20 21 22 23 24 25 26 27 28 29 VCS = vcs -full64 -cpp g++-4.8 -cc gcc-4.8 \ -LDFLAGS -Wl,--no-as -needed \ -f filelist.f \ -timescale=1ns/1ps \ -R \ -debug_acc+all \ +define+FSDB \ -lca -kdb \ -ntb_opts uvm-1.1 \ -sverilog \ +v2k \ |tee vcs.log
sim:用来使用vcs自带的仿真工具生成波形,这里我没用过。
verdi:用来查看fsdb的波形文件,这个是我最常用的,通过这个可以很方便的对波形进行追溯,调试起来很容易。
clean:用来删除生成了的文件。
以防有人不会用Makefile,说一下他的用法。在Makefile文件所在的目录打开终端,使用make [指令]的方式来运行,Makefile本质来说就是将指令进行了一个打包,我这里运行verdi -f filelist.f -sv -ssf tb.fsdb &和make verdi的效果是一样的。
3.2 filelist文件的编写 下面是我针对本项目编写的filelist文件。
1
2
3
4
5
6
7
8
9
10
11
12
13
14
15
16
17
18
19
20
21
22
23
24
+incdir+$UVM_HOME/src $UVM_HOME/src/uvm_pkg.sv ../testbench/fifo_if.sv ../testbench/fifo_transaction.sv ../testbench/fifo_driver.sv ../testbench/fifo_in_sequencer.sv ../testbench/fifo_in_monitor.sv ../testbench/fifo_out_monitor.sv ../testbench/fifo_in_agent.sv ../testbench/fifo_out_agent.sv ../testbench/fifo_model.sv ../testbench/fifo_scoreboard.sv ../testbench/my_env.sv ../testbench/fifo_chk_rst.sv ../testbench/base_test.sv ../testbench/fifo_case0.sv ../testbench/top_tb.sv ../DUT/pointer.v ../DUT/sync.v ../DUT/fifo_top.v ../DUT/memory.v ../DUT/comparator.v
可以分为三个部分,首先是前两行的+incdir+$UVM_HOME/src和$UVM_HOME/src/uvm_pkg.sv,第一句话表示将$UVM_HOME/src中的所有文件加入到编译列表中,这个文件里基本上是所有uvm库所需要的文件,什么uvm_env呀之类的就是这里定义。然后uvm_pkg.sv相当于是所有文件的核心实现,在tob_tb中,只需要调用import uvm_pkg::*;便可以将所有uvm包含进来。
$UVM_HOME表示的是一个宏定义,在Lunix中主目录的.bashrc中定义,我这里的原话是export UVM_HOME=/home/wxm/uvm_study/uvm-1.1d
3.3 另辟蹊径 还有一个别的方法,你只需要写两个文件就可以:一个是top_tb.sv;另一个是fifo_top.v,前提是你需要在这两个文件里面把其余所有的文件include一遍,就像这样:
1
2
3
`include "../testbench/my_driver.sv" `include "../testbench/my_model.sv" ...
因为你的Makefile和filelist以及终端运行的位置都在sim文件夹,而其他文件在testbench和dut文件夹,因此你在include的时候需要以sim文件夹为根目录,使用../回到上一级,再使用/testbench/XXX.sv来调用这些文件。这样操作就不需要在filelist中调整顺序了。
总结 总而言之,这是一个很好的练习UVM的项目,因为其与《UVM实战》这本书的内容大差不差,很多在结构上都有相似的地方,我希望从这个项目为起点,依次加深我对IC验证这一领域的认识。后面我会对该项目的波形图进行研究,并通过调整UVM代码实现一些不一样的功能。

 wechat